Controller
Introduction
When releasing XREAL glasses to consumers, the package includes only the glasses, without any controllers or computing units. Users can connect the XREAL glasses to their own Android phones or the Beam Pro, which can function as 3DOF controllers. The integration follows standard XR controller setups, binding specific actions to your desired inputs.
To create unique experiences that stand out, you can fully customize the controller interface within your MR application.
Controller Features Description

- 3DoF Tracking
- Touchpad: Acts as the “Trigger” button and functions as a touchpad for detecting touch and swipe gestures. This can be customized for various app-specific functions, such as scrolling.
- Home Button: Used to recenter the controller when pressed and held. It can also be customized for other in-app actions, such as navigating back to a previous step.
- App Button: Another customizable button, which can be used to trigger various in-app functions, like opening a menu or performing a special action.
Using the XREAL Phone Controller
One of the benefits of the XREAL phone controller is the ease with which you can customize its UI interface. There are two main approaches to utilizing the XREAL phone controller:
1. Default Method
When running the XREAL app on your Android device, a default virtual controller (the “XREALVirtualController” prefab) is automatically loaded without additional setup. This controller includes the three standard buttons: Trigger, Home, and App.
2. Custom Method
For those seeking to tailor the controller interface, the XREALVirtualController prefab can be manually added to your scene, serving as a foundation for building a customized input interface.
You can enhance the Virtual Controller by adding two types of buttons:
-
Input Action Buttons: These buttons are linked to specific actions within Unity’s Input System, allowing you to handle inputs from various devices seamlessly. Use them for core in-game actions such as movement and interaction.
-
UI Buttons: These on-screen interactive elements are part of the Unity UI system. Use them for menu navigation and application control to provide users with an intuitive and accessible interface.
For detailed instructions on adding and configuring these buttons, please refer to the Developer Guide below. Customize the style and functionality of the controller UI to align with your application’s unique requirements.
Customize Controller UI
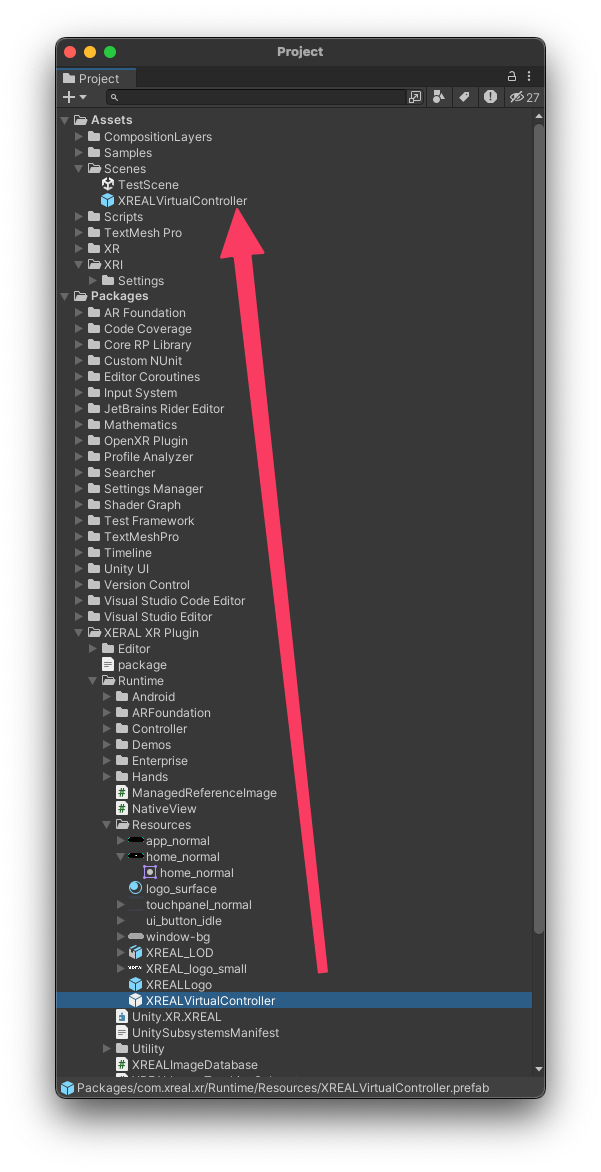
1. Add the Prefab to Your Project
- In the Project panel, locate the "XREALVirtualController" prefab, and drag it to your Assets folder.
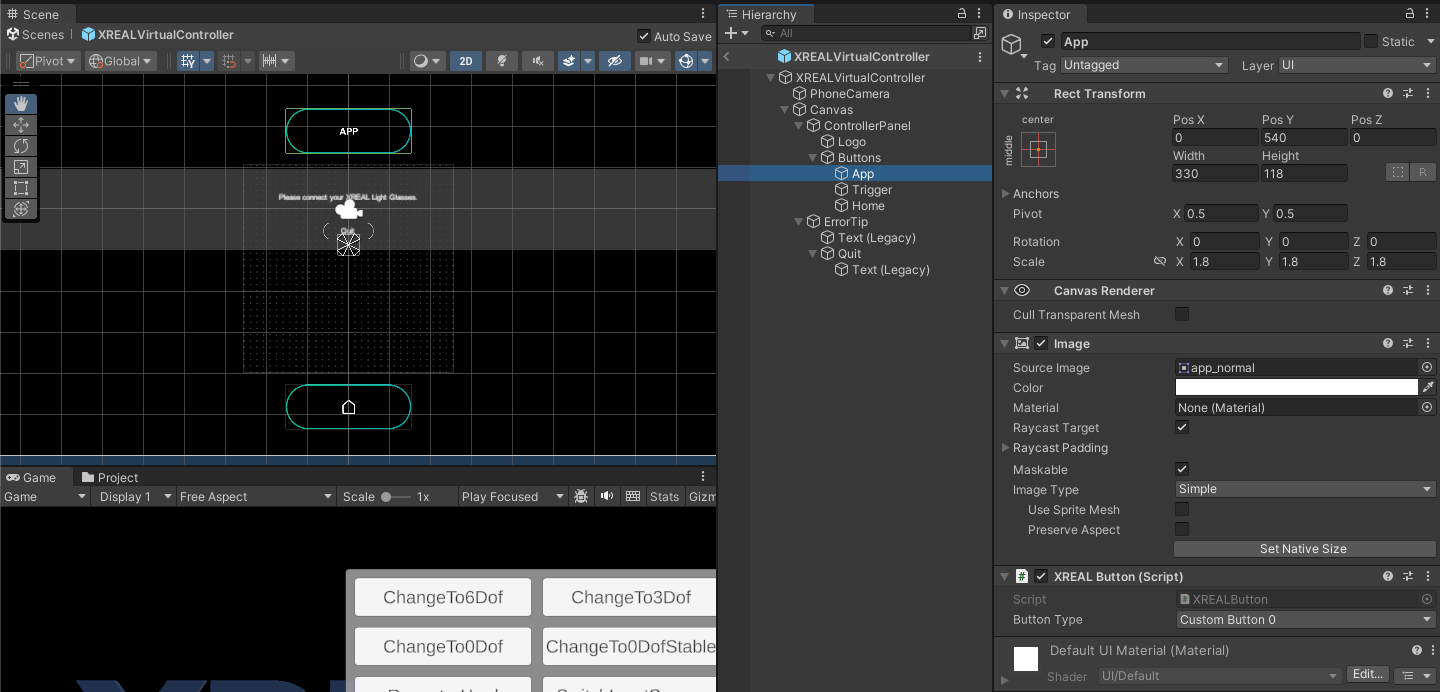
2. Customize the Controller
- Double-click the "XREALVirtualController" object in the Project to open it. From here, you can design buttons and other UI elements to fit your application’s needs.
3. Add a New Input Action Button
-
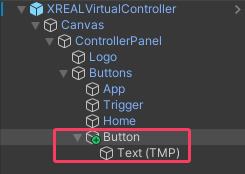
Create a Button
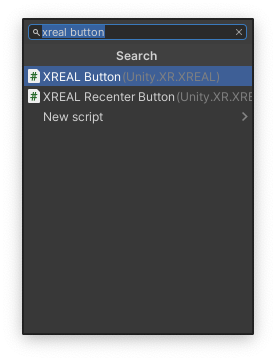
Under the “Buttons” GameObject in the hierarchy, create a new button. In the Inspector panel, click “Add Component,” search for “XREAL Button,” and add it.
-
Set the Button Type
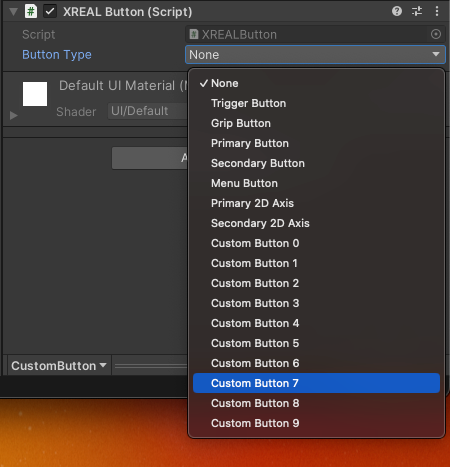
In the Inspector panel, define the Button type of your custom button.

-
Configure Input Actions
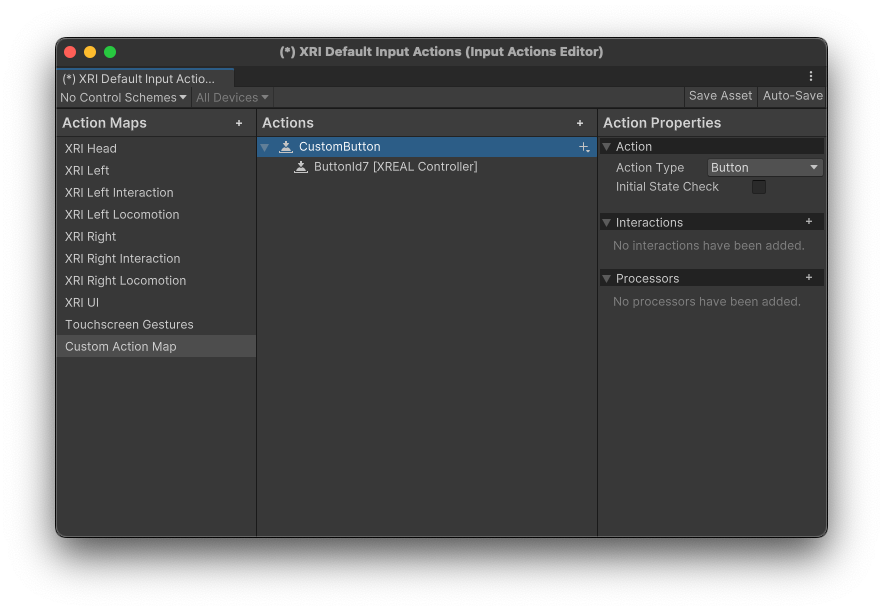
Open “XRI Default Input Actions” from the Project panel.

-
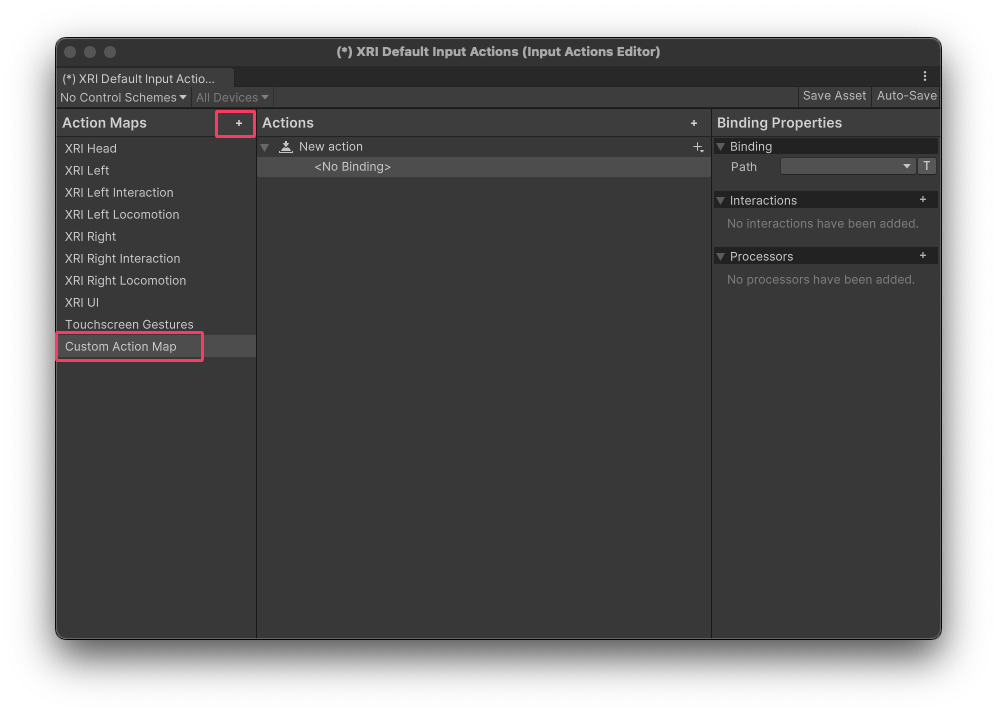
Create a New Action Map
Add a new action map by clicking the “+” button.
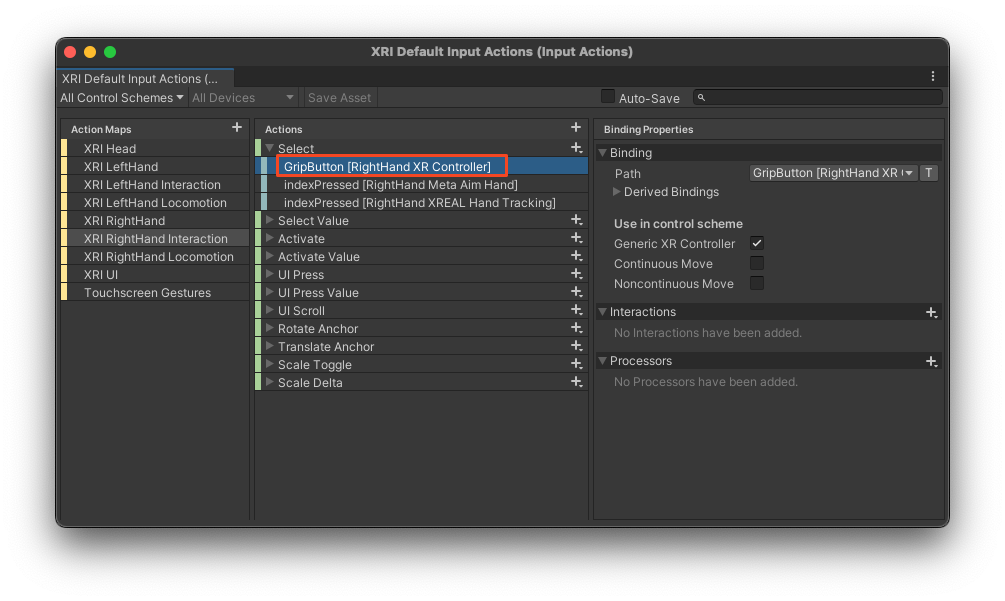
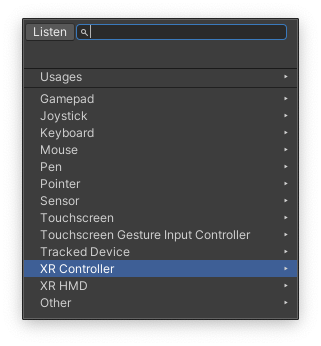
- Add a Binding to the Action
Click No Binding, go to Path in Binding Properties -> Binding, and select XR Controller -> XREAL Controller.
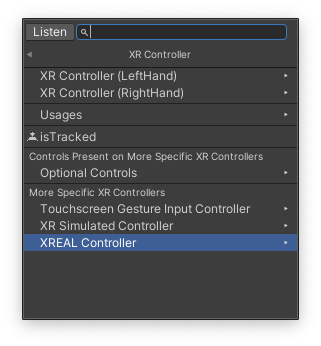
-
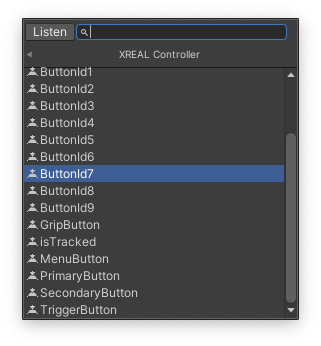
Select a Button
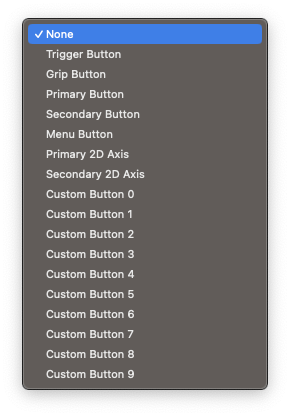
Choose the appropriate button, for example, ButtonId7.
- Assign Custom Button
In the Button type of your custom button, select Custom Button 7.
-
Implement Custom Button Functionality
Create a script to handle the button action. Here's an example script that changes the color of a sphere when the custom button is pressed:
using System.Collections;
using System.Collections.Generic;
using UnityEngine;
using UnityEngine.InputSystem;
public class CustomButtonActionHandler : MonoBehaviour
{
    public InputActionReference buttonAction; // Drag your InputAction here in the Inspector
    public GameObject sphere; // Drag your sphere GameObject here in the Inspector
    public Color targetColor = Color.red; // Color to change to when button is pressed

    private Renderer sphereRenderer;
    private Color originalColor;

    private void Awake()
    {
        if (sphere != null)
        {
            sphereRenderer = sphere.GetComponent<Renderer>();
            originalColor = sphereRenderer.material.color;
        }
    }

    private void OnEnable()
    {
        buttonAction.action.performed += OnButtonPressed;
        buttonAction.action.Enable();
    }

    private void OnDisable()
    {
        buttonAction.action.performed -= OnButtonPressed;
        buttonAction.action.Disable();
    }

    private void OnButtonPressed(InputAction.CallbackContext context)
    {
        if (sphereRenderer != null)
        {
            sphereRenderer.material.color = targetColor;
        }
    }
} -
Build and run Since you cannot debug the custom controller with input action buttons in the Unity Editor, build the app and test it on your Android phone or Beam Pro.
4. Add a New UI Button
Adding a UI button to the Virtual Controller is straightforward:
- Add the Button: Place the new button under the “Buttons” section of the Virtual Controller.
Important: Ensure new buttons are added at the end of the hierarchy to avoid overlap issues, such as the Trigger button obstructing the new button.
-
Set Up Interaction: for example, create a cube with a color-switching script
-
In your scene, add a Cube.
-
Attach a script to the Cube that will change its color when invoked.
  using UnityEngine;

  public class ChangeColorOnClick : MonoBehaviour
  {
      // Define an array of colors to choose from
      public Color[] colors;

      // Reference to the Renderer component
      private Renderer ballRenderer;

      // Index to track current color
      private int currentColorIndex = 0;

      void Start()
      {
          // Get the Renderer component of the GameObject
          ballRenderer = GetComponent<Renderer>();

          // Initialize the colors array if it's empty
          if (colors == null || colors.Length == 0)
          {
              colors = new Color[] { Color.red, Color.green, Color.blue, Color.yellow };
          }

          // Set initial color
          ballRenderer.sharedMaterial.color = colors[currentColorIndex];
      }

      public void OnMouseDown()
      {
          // Change to the next color in the array
          currentColorIndex = (currentColorIndex + 1) % colors.Length;

          // Update the color of the material
          ballRenderer.sharedMaterial.color = colors[currentColorIndex];
      }
  }
-
-
Manage the Button’s Interaction:
-
Since the Virtual Controller is not instantiated into the scene at runtime, you’ll need to create a ButtonManager to control the interaction.
-
This manager should be responsible for finding the Cube in the scene and executing the color change logic.
using System.Collections;
using System.Collections.Generic;
using Unity.VisualScripting;
using UnityEngine;

public class Manager : MonoBehaviour
{
    // Start is called before the first frame update
    ChangeColorOnClick cube;
    void Start()
    {
        cube = FindObjectOfType<ChangeColorOnClick>();
    }

    // Update is called once per frame
    void Update()
    {

    }

    public void changeColor()
    {
        cube.OnMouseDown();
    }

}
-
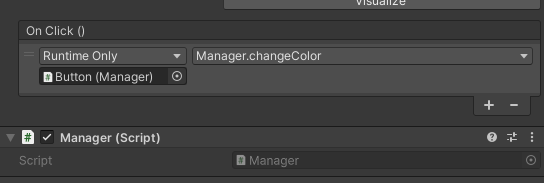
Set Up the Button’s OnClick() Callback:
-
On the newly added button, set up an OnClick() event.
-
Connect this event to the method in your ButtonManager that handles the color change of the Cube.
-
-
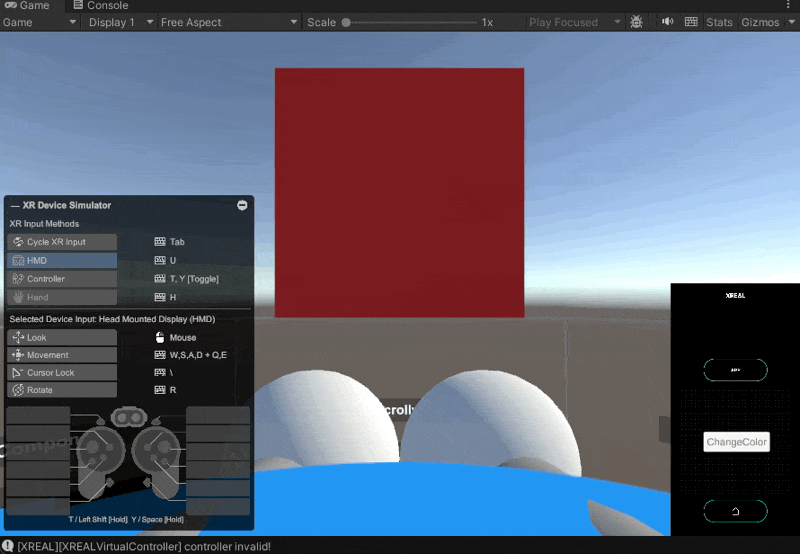
Test in the Editor:
Drag the XREAL Virtual Controller prefab into the scene and enter Play mode in the Editor to test the button functionality.
Enable Vibration Permission
To enable vibration functionality for the Controller, include an AndroidManifest.xml file in the Assets/Plugins/Android/ folder to request the necessary vibration permission and ensure it includes the following content:
<?xml version="1.0" encoding="utf-8"?>
<manifest xmlns:android="http://schemas.android.com/apk/res/android"
    package="com.DefaultCompany.xrealsdktest">

    <!-- Request vibration permission -->
    <uses-permission android:name="android.permission.VIBRATE"/>

</manifest>